Fingerings
The great strength of smartChord is the determination of every possible fingering for each stringed instrument and every possible tuning. There are hundreds of possible fingerings for each simple chord and tuning. The building of fingerings differs from instrument to instrument as there are huge differences between an eight-string Guitar and a three-string Cigar Box Guitar. The usage of fingerings differs from musician to musician. It depends on their preferences and skill level.
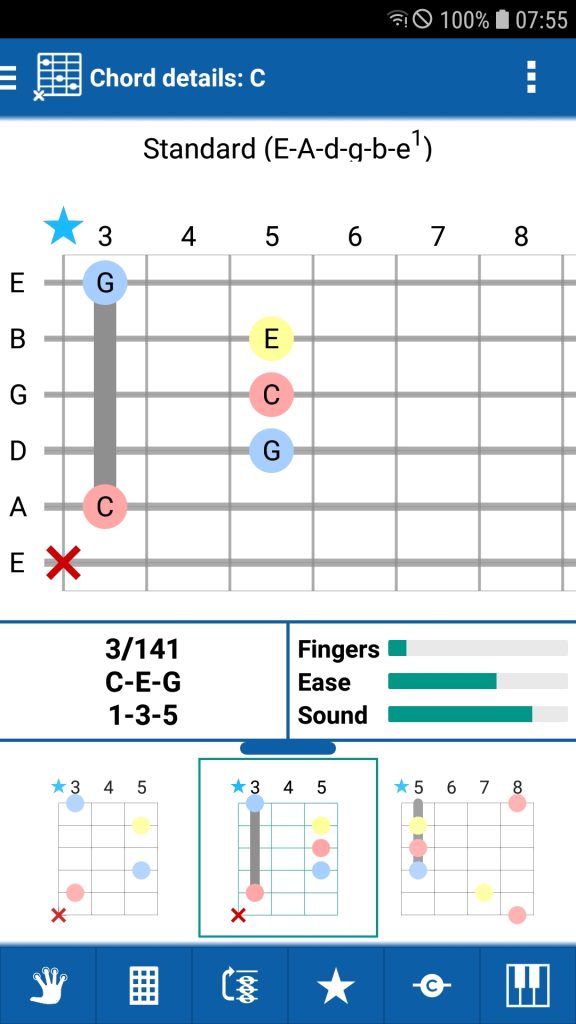
Fingering details
Chord shapes differ not only in how they are played, but also in their structure and the composition of the chord itself.
You can display useful information on the fretboard diagram — such as note names, relative notes (degrees), intervals, or even the most suitable fingering positions.
Use the ‘C on string’ button to switch between these different views at any time.


Approach for best fingerings
- Define your fingerings favorites and keep them up to date, as preferred fingerings always take precedence over all other voicings.
- You may also want to enable the Common Chord Setting “Favor fingering pattern”. When activated, fingerings with the same pattern as one of your favorites are also treated as favorites — even if they are not explicitly marked as such.
- Review your Chord and Instrument settings carefully — they play the biggest role in determining the generated fingerings. To help you get the best results quickly, you can start with the recommended presets for beginners, intermediate players, or advanced players.
- Consider enabling the CAGED system as well. With this option active, every fingering that matches a CAGED fingering pattern is automatically treated as a favorite.
Fingering favorites
Fingering favorites is a strong construct to always get the best results, as your fingering favorites are always preferred before all others, regardless of the sorting order. The songbook, for example, uses and shows your fingering favorites if you add a new song to it.


Some things you should know:
- The fingering favorites are specific to a tuning. If you have different instruments with the same tuning, you’ll get the same fingering favorites.
- The button with the star can be used to maintain your favorites. Alternatively, you can do this with for a long-press in every ‘fingering gallery’.
- You can favor fingerings by pattern. This is a common chord setting and not specific to an instrument. If it is activated, also non-fingering favorites are treated as favorites, if their fingering pattern is the same as a fingering pattern of one of your fingering favorites. Example: If the F barré chord is one of your fingering favorites, all other barré chords, like e.g. the G barré chord, with the same grip shape are also treated as favorites. They are marked with a blue star.
- You can favor fingerings according to the CAGED system. This is also a common chord setting and not specific to an instrument. If it is activated, the fingerings obeying the patterns of the CAGED system are automatically favored. They are also marked with a blue star.


The following example explains how ‘favor fingerings by pattern‘ works:
- Assume that you favored the standard C fingering.
- D4add9 does have the same pattern, which means, that you have to use your fingers in the same way, but on different frets.
- smartChord detects the same pattern for D4add9 and marks it with a blue star.


Most important settings
smartChord does have a large set of instrument-specific ‘instrument’ and ‘chord’ settings to control the determination of the fingerings. We strongly recommend taking the time and adjust the settings individually. The following paragraphs will guide you through the settings. Be aware that these settings are instrument-specific and you have to adjust them for every instrument you use.
Instrument
- Choose your instrument as the relevant settings are instrument-specific.
- Choose your tuning
- Set the number of frets to the last fret you really use. If you set it to a higher number, also fingerings are taken into account, which is not of interest to you. The list of fingerings will be unnecessarily long.
Skill level
Make a self-assessment and define your skill level. This will change the settings to a reasonable preset. A beginner will need fewer and easier chords and fingerings than a professional musician. Please note that changing the skill level may change the settings that you have already made.
Sort order
The sort order is responsible to sort the list of fingerings in the chord galleries and overview screens. It is very decisive to get the best fingering for the situation. If smartChord has to show just one fingering for a chord (e.g. in the songbook), it takes the first in the sorted list. But keep in mind – your favorite fingerings always take priority and are listed always at the top of the list.
- Default:
It is the standard sort order focusing on the sound of the voicing, the difficulty to grip the fingering and the position on the fretboard. As a result, you’ll get the best sounding voicing which isn’t too difficult. - Ease:
It prefers grips that are easier to grip. This could be an option for beginners. But keep in mind, that the easiest fingerings are often not the ones with the best sound. - Finger:
Prefers fingerings where you do need less or no finger to grip them, no barré, and no muted strings. - Frets:
Relevant is the position on the fretboard. Use it if you are looking for a fingering, which is near the other fingerings in your chord progression, so the movement of your hand is minimal, and changing the grip will take less time. - Sound
This choice is only focusing on the sound and the best sound is preferred.
Maximal frets per chord
It is the number of frets you have to span with your fingers. More than 5 frets are difficult to play – maybe not even possible. A higher number leads to a larger number of possible fingerings. But they could be too difficult for you. A low number leads to fewer fingerings or even no result.
Maximal number of fingers
This means the number of fingers with which you can grasp a chord. Four is normal. The thumb is not counted because it is only the opponent at the back of the neck. If you are a beginner or you have a handicap, you can reduce this number. The fingering will be easier, but the selection and the sound will usually suffer.
Show barré chords
Deactivate this option, if you are not able to play barré chords. They will be filtered out. But we would like to encourage you to learn them. It is worth the effort.
Mandatory root
A chord’s deepest tone is the root and leads to its name. If you disable this option, this rule will be invalidated and you will get chord inversions. This is used often on instruments with fewer strings like a Cigar Box Guitar or a Ukulele as an inverted chord is sometimes the only possibility to play a chord.
Allow rootless chords
If this option is activated, chords are regarded as complete, even if the root note is dropped. It will make it easier to play a chord as you have to play one note less. Some chords are just possible as rootless chords on instruments with fewer strings like a Cigar Box Guitar or a Ukulele. You can easily use rootless chords if you’re playing in a band, as often the bass player will play the root note. Or use it if you like the ‘jazzy’ sound of rootless chords (see more).

Fingering explorer
The ‘Fingering explorer‘ will assist you to find the best fingerings for your needs:

You can change the relevant chord settings and get the resulting fingerings immediately in the gallery. If you have found a great fingering, define it as a fingering favorite. Fingering favorites are always visible and top listed, independent from the chord settings.
At the end of your exploration, you can apply the chord setting changes or discard them.
Be aware, that …
- the list of settings is scrollable and not every setting is visible when opening the screen
- there is a handle to resize the fretboard grid
- you can change the size of the chord diagrams with a pinch-zoom gesture
Overview fingerings
The overview screen gives you an overview of the different ways to play a chord. You can use the pinch gesture to make the chord diagrams smaller or bigger.
