Use Bluetooth and MIDI devices
Control the Set list and the Songbook
The Set list and Songbook have support for Bluetooth and MIDI devices which you can configure individually.
- Switch between the songs in the set list
- Scroll up or down, page up or down
- Start/stop the scrolling, metronome, drum machine, audio-, video-, or YouTube player
- Select a song with a MIDI command
- Control a MIDI device and send MIDI commands to it
Use the settings in the Set List or Songbook to configure the Bluetooth and MIDI devices. MIDI support needs Android 6.0 Marshmallow or newer.
How to configure a Bluetooth pedal
1 Overview
With smartChord you can use a Bluetooth pedal to control the songs in your Set list while playing — completely hands-free. This is a huge help on stage when both of your hands are busy with your instrument.
The Bluetooth pedal control allows you to navigate between songs and within a song without ever touching your phone or tablet. It works with the PageFlip pedal and any other external Bluetooth device that sends standard key signals.
2 Supported Devices and Actions
Any external Bluetooth pedal that appears as a keyboard to your phone or tablet will work — for example a PageFlip pedal. smartChord also supports MIDI devices via USB or Bluetooth MIDI, which gives you the same actions plus additional MIDI features.
2.1 Available Actions
- Next — jump to the next song in the set list
- Previous — jump to the previous song
- Page up / Page down — scroll one page within the current song
- Scroll up / Scroll down — scroll line by line
- Start/stop — start or stop the auto-scroller, the audio player and the metronome together
- Start/stop auto scroll — control the auto-scroller only
- Start/stop metronome — control the metronome only
3 Opening the Pedal Configuration
The pedal configuration lives inside the Set list settings. Three quick taps and you are there.
3.1 Step by Step
- Open the smartChord toolbox and tap Set list
- In the Set list screen, open the menu and choose Settings
- In the Settings, tap Pedal to open the pedal configuration
For a complete tour of the Set list, see Set list overview and Use a Set list.

Open the Set list and choose “Settings” from the menu

Tap “Pedal” to open the pedal configuration
4 Assigning Actions to Your Pedal
Once the pedal configuration is open, you can teach smartChord which pedal button should trigger which action. The process is the same for every action and every pedal button.
4.1 Step by Step
- Select the action you want to assign to your pedal (for example Next)
- Tap Assign to start the assignment
- smartChord now waits for a signal — the prompt “Press your pedal” appears
- Press the button on your pedal that should trigger the chosen action
- The detected signal name (e.g.
DPAD_RIGHT) is stored next to the action — the assignment is finalized
Repeat for every action you want to control with your pedal. Use Reset to clear an existing assignment, or Cancel while waiting for a signal to abort.

Select the action and tap “Assign”
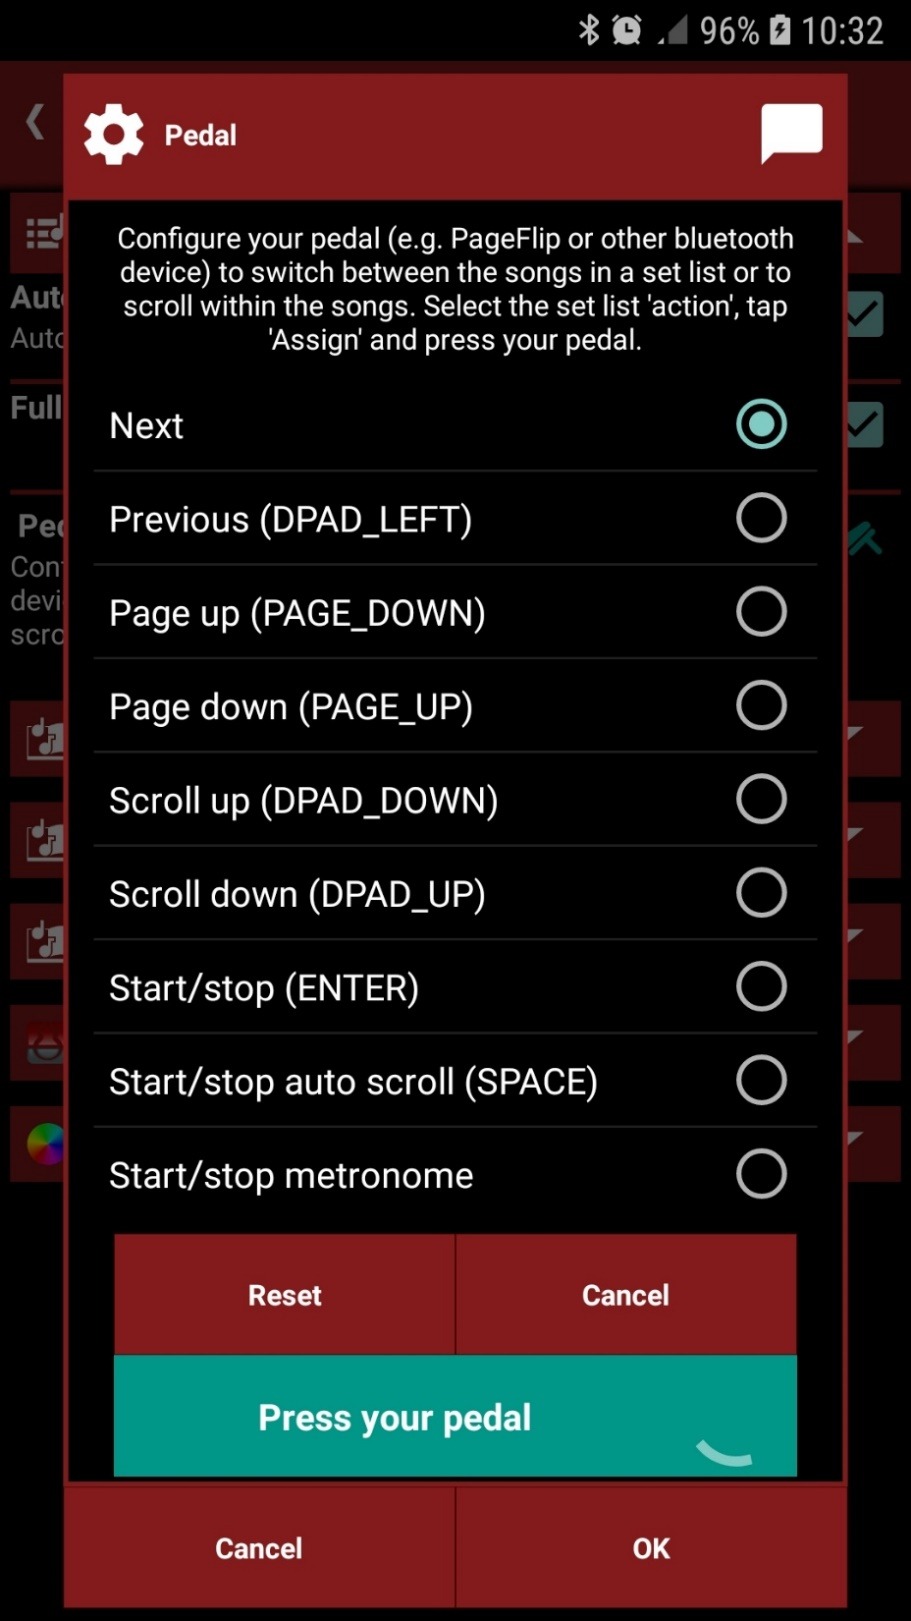
smartChord waits for a signal — press your pedal

The signal name (e.g. DPAD_RIGHT) confirms the assignment
5 Tips for Live Performance
A few small settings turn your pedal-driven Set list into a smooth on-stage experience:
- Enable “Automatic start” in the Set list settings so that scroller, audio and metronome start as soon as you open a song
- Enable “Fullscreen” to keep the lyrics and chords as readable as possible during the gig
- Bind a single pedal button to Start/stop to control scroller, audio and metronome together — one tap, everything in sync
- Use Page up/Page down for songs with chord diagrams or PDFs, and Scroll up/Scroll down for line-by-line lyric sheets
- Pair smartChord with your pedal once via the Android Bluetooth settings — after that it reconnects automatically
For more tips on running a gig from the Set list, see the Set list FAQ.
There is a video about ‘How to configure a Bluetooth pedal’:

How to configure a MIDI device
1 Overview
With a MIDI source — for example a MIDI foot pedal — you can control your Set list and Songbook hands-free while playing. Switch songs, scroll through chords and lyrics, and start or stop the player, the auto-scroller, or the metronome by simply tapping a pedal.
2 Supported Actions
Each MIDI signal can be mapped to one of the following actions in the Set list or Songbook:
- Next — jump to the next song in the set list
- Previous — jump to the previous song
- Page up / Page down — scroll one page within the current song
- Scroll up / Scroll down — scroll line by line
- Start / stop — start or stop everything (auto-scroller, audio/video player, metronome) at once
- Start / stop auto scroll — control only the auto-scroller
- Start / stop metronome — control only the metronome
For details on the auto-scroller, see Auto-scroll songs, images, and PDFs.
3 Open the Set List
The MIDI source is configured from inside the Set list (or alternatively the Songbook). Start by opening the Set list tool from the smartChord toolbox.

An example set list ready to be played live
Need to build a set list first? See Create a set list and Set list overview.
4 Select Your MIDI Source
Open the Set list Settings and scroll to the Set list section. Two entries are relevant:
- MIDI source — pick the connected MIDI device (e.g. AKAI LPK25 Wireless) that smartChord should listen to
- MIDI source configuration — assign actions to the keys, pads, or pedals of that device
If you prefer a Bluetooth pedal instead of MIDI, use Pedal configuration on the same screen.

Set list settings with the MIDI source selected
5 Assign Actions to MIDI Signals
Tap MIDI source configuration to open the assignment dialog. The list shows every supported action; the column on the right shows which MIDI signal is currently bound to it.
5.1 Step by Step
- Select the action you want to assign (for example Next)
- Tap Assign — smartChord switches into listening mode and shows “Press a key”
- Press the desired key, pad, or pedal on your MIDI device
- The detected MIDI signal (e.g. NoteOn(1, 0) / NoteOff(1, 0)) is shown next to the action and the assignment is finalized
- Repeat for every action you want to control, then confirm with OK
Use Reset to clear an existing binding, or Cancel to abort the current assignment.

Pick an action and tap “Assign”

smartChord is waiting for a MIDI signal

The signal name confirms the finalized binding
NoteOn(1, 0) means a Note-On message on MIDI channel 1 with note number 0. Other devices may report Control Change (CC) or Program Change (PC) messages instead — smartChord accepts all of them.
6 Sending MIDI Commands from Songs
The integration also works the other way around: a song in the Songbook can send MIDI commands when it is opened or closed — for example to switch the patch on a synth or pedalboard at the start of a song.
6.1 Available Directives
{x_sccrd_midiOpen: <commands>}— sent when the song is opened{x_sccrd_midiClose: <commands>}— sent when the song is closed{x_sccrd_midi: Name; <commands>}— named command, triggered manually{x_sccrd_midiSongSelect: <number>}— selects a song by MIDI number (range 0–127 or 1–128, depending on the device)
6.2 Command Formats
- Shorthand:
- Control Change —
CC#<controller>:<value>(channel optional, defaults to 1) - Program Change —
PC#<program>(channel optional, defaults to 1)
- Control Change —
- Hexadecimal — space-separated bytes without a
0xprefix
Valid ranges: channel 1–16, controller / program / value 0–127. Edit these commands per song under Edit → MIDI → MIDI on opening / closing.
7 Verify with the MIDI Test Tool
If a key press does not seem to reach smartChord, the built-in MIDI Test tool helps you find out why. It displays every incoming MIDI message in the same directive format used by the Songbook, and it can also send commands to a connected MIDI device for outbound testing.
- Activate the MIDI interface in the settings
- Pick a MIDI source for receiving and a MIDI receiver for sending
- Press a key on your pedal or keyboard — the message appears in the log
- Type a command and tap Send to forward it to the receiver
For the full description, see MIDI Test.
8 Tips for Live Use
- Enable Fullscreen and Automatic start — both options sit right above the MIDI settings and are perfect for stage use
- Bind Start / stop to a single pedal — one tap controls scroller, audio, and metronome together
- Use Page up / Page down for songs that do not auto-scroll well, e.g. lead sheets with many chord diagrams
- Combine MIDI control with set list link to keep multiple devices in sync — see Set list link
- For more questions, check the Set list FAQ
There is a video about ‘How to configure a MIDI device’:

MIDI settings
Before you can use your MIDI devices, you have to select them in the settings. You also have to map the MIDI messages to the actions in the Set list and Songbook. Please check your settings. They are valid for the Songbook and the Set List. To use the MIDI integration, you need to have Android 6 or later on your device. Android supports MIDI over USB or Bluetooth.

Select a song with a MIDI command
The songbook allows you to switch the songs with a MIDI command from your MIDI device. To enable the song selection you have to do these two steps:
- Select the MIDI device in the settings (MIDI source).
- Insert the directive {x_sccrd_midiSongSelect:<number>} in each song you want to select by a MIDI device. The <number> has to be between 0 and 127 or 1 and 128. This depends on your device.
If your MIDI device sends the MIDI command SongSelect (0xF3), smartChord looks for the song with the x_sccrd_midiSongSelect directive and the song number. The song number is part of the command. If a song with this number is found, the songbook switches automatically to this song. If no song with the number is defined, nothing happens. If more than one song does have this number, the first found song with the number is selected.
Control a MIDI device
You can send MIDI commands from the Set List and Songbook to a MIDI device to assist you during practice or performance. These commands allow the Set List and Songbook to act as a central controller, preparing your MIDI equipment (keyboards, sound modules, effects, sequencers) automatically for each song you play.
How to use MIDI commands in the Set List
The Set List enables you to control MIDI equipment, such as effects processors or sequencers. You can assign MIDI commands to be sent when a Set List entry (including songs, PDFs, images, and breaks) is opened or closed. Each message sent to your MIDI device can contain multiple commands.
To use this functionality, first configure your MIDI device as a MIDI receiver in the settings. Once a MIDI receiver is defined and a Set List is started, the MIDI commands designated for “opening” the initially displayed entry are automatically sent to your MIDI device. When you navigate to a different entry, the MIDI commands for “closing” the current entry are sent first, followed by the “opening” commands for the newly selected entry.
To define MIDI commands for a specific Set List entry, first select the desired entry. Then, press the Edit button and choose either ‘MIDI -> MIDI on opening’ or ‘MIDI -> MIDI on closing’. A dialog box will appear where you can enter your commands.
For an overview of all MIDI commands within the Set List, you can display them in the information section. If visible there, you can conveniently click directly on a MIDI command to modify it.

How to use MIDI commands in the Songbook
To send MIDI commands, you have to:
- Define the ‘MIDI receiver’ in the section ‘MIDI’ of the settings
- Add special directives within the song.
The directive x_sccrd_midiOpen defines the MIDI commands which are sent to a MIDI receiver when the song is opened, the directive x_sccrd_midiClose when the song is closed. Both directives are not visible in the songbook.
The directive x_sccrd_midi defines also MIDI commands, but these directives are visible as grey ‘MIDI’ lines. They are automatically sent when the scroller scrolls the song and the line reaches the top or if you tap the line. You can give this commands a meaningful name. Put the name behind the colon and end it with a semicolon to separate it from the midiCommands.
- {x_sccrd_midiOpen: <midiCommand1>, <midiCommand2>, …}
- {x_sccrd_midiClose: <midiCommand1>, <midiCommand2>, …}
- {x_sccrd_midi: Optional meaningful name; <midiCommand1>, <midiCommand2>, …}
A directive can define multiple MIDI commands. The commands have to be separated by a comma. You can have multiple MIDI directives in a song. The commands are sent according to the order in the song.
Defining MIDI Commands
smartChord accepts MIDI commands in multiple formats. You can use the familiar shorthand notation used by most professional MIDI devices, or enter raw hexadecimal bytes directly — whichever you are more comfortable with.
Shorthand Notation
Instead of calculating hexadecimal values by hand, you can enter commands the same way they are described in the manual of your MIDI device:
Control Change (CC)
CC#<controller>:<value>| Input | Meaning | Sent as |
|---|---|---|
CC#7:100 | CC controller 7, value 100, channel 1 | B0 07 64 |
CC#34:64 | CC controller 34, value 64, channel 1 | B0 22 40 |
CC2#91:64 | CC controller 91, value 64, channel 2 | B1 5B 40 |
The channel number is optional and defaults to 1. The value is optional and defaults to 0.
Program Change (PC)
PC#<program>| Input | Meaning | Sent as |
|---|---|---|
PC#0 | Program 0, channel 1 | C0 00 |
PC#5 | Program 5, channel 1 | C0 05 |
PC3#17 | Program 17, channel 3 | C2 11 |
Again, the channel number is optional and defaults to 1.
Valid ranges:
- Channel: 1–16
- Controller / Program / Value: 0–127
Raw Hexadecimal Bytes
You can always enter commands directly as space-separated hexadecimal bytes. This is the format used for SysEx and any other MIDI message type:
| Input | Meaning |
|---|---|
B0 07 64 | Control Change, channel 1, controller 7, value 100 |
C0 05 | Program Change, channel 1, program 5 |
F0 41 10 00 12 F7 | SysEx message |
FA | MIDI Start |
FC | MIDI Stop |
The leading 0x is not needed — plain two-digit hex values separated by spaces are sufficient.
Mixing formats in one directive
All formats can be freely combined within a single directive, separated by commas as usual. For example:
{x_sccrd_midiOpen: CC#0:0, CC#32:8, PC3#17}This sends a Bank Select MSB, Bank Select LSB, and a Program Change on channel 3 — all in one go, using the familiar shorthand instead of raw hex bytes.
You can get a short introduction here:
https://ccrma.stanford.edu/~craig/articles/linuxmidi/misc/essenmidi.html and http://www.music-software-development.com/midi-tutorial.html
Key MIDI Command Types & Examples:
- Program Change (PC) & Bank Select (CC 0/32):
- Purpose: Automatically selects the correct instrument sound/patch.
- Sample:
- When you open “Song A” in the app, it sends
Bank Select MSB 0,Bank Select LSB 0, thenProgram Change 5to your keyboard to select the “Electric Piano 1” sound. - When you switch to “Song B”, it sends
Bank Select MSB 0,Bank Select LSB 8, thenProgram Change 17to select a “Synth Brass” sound from a different bank.
- When you open “Song A” in the app, it sends
- Control Change (CC):
- Purpose: Adjusts parameters like volume, effects, or expression for the selected song.
- Sample:
- Along with selecting the sound for “Song A”, the app sends
CC 7, Value 100to set the channel volume to about 80%. - For a ballad “Song C”, it might send
CC 91, Value 64to increase the reverb depth.
- Along with selecting the sound for “Song A”, the app sends
- System Real-Time (Start/Stop/Clock):
- Purpose: Controls playback and tempo of external devices like drum machines or backing track players.
- Sample:
- When you select “Uptempo Song D”, the app sends a
MIDI Start (FA)command to trigger the corresponding drum pattern on your drum machine. - It might also continuously send
MIDI Clock (F8)messages based on the song’s tempo (e.g., 120 BPM) to keep the drum machine in sync. When you close the song, it sendsMIDI Stop (FC).
- When you select “Uptempo Song D”, the app sends a
- System Exclusive (SysEx):
- Purpose: Sends complex, device-specific data to load entire setups.
- Sample:
- For a complex “Performance Song E”, the app could send a long SysEx message that configures keyboard splits, layers, multiple effects, and specific synth parameters all at once on your synthesizer – a complete recall of a custom setup for that song.
MIDI test
The smartChord tool ‘MIDI test’ can help you write MIDI commands, as it shows MIDI messages received from a MIDI device in the form you need for the MIDI directives. It allows you also to send messages to a MIDI device. This tool is available with version V7.17 or newer.
