Cloud
smartChord uses your cloud service to back up your content, sync it between your devices, or sync the songs and set lists with your friends and band members. GoogleDrive, Dropbox and NextCloud are supported.
Cloud sync is the easiest and therefore the recommended option. However, it is also possible to sync data without using the cloud. This method is more complex and only recommended for technically experienced users. To use this approach, simply select “This Android device” when choosing your cloud option. For this purpose, we have created a step-by-step guide using the tool Syncthing as an example.
Choosing the right cloud
We support the most common cloud providers: Each service has its own strengths. This guide helps you decide which one is best for your needs.
NextCloud – Best for Privacy and Team Collaboration
Why choose NextCloud?
- You want full control over your data.
- You use a self-hosted or trusted third-party NextCloud instance.
- You need team collaboration with shared access for bands, schools, or organizations.
- You’re concerned about data privacy or avoiding big tech platforms.
- You’re part of a private or professional IT setup.
When to use it?
- You or your group already use NextCloud for other purposes.
- You want to host your own cloud or use one provided by your institution.
- You want to avoid ads, tracking, and third-party data access.
- You’re managing a band, choir, or team that needs shared folders and better access control.
NextCloud does not support names that contain the # (hash) character. Please avoid using it in your names to ensure proper syncing.
Google Drive – Best for Simplicity and Availability
Why choose Google Drive?
- You already have a Google account.
- You want something that’s easy to set up and use.
- You need reliable syncing with good cross-platform support.
- You’re working alone or with casual collaboration.
When to use it?
- You just need a simple backup and sync across your own devices.
- You occasionally share songs or set lists with friends.
- You trust Google and are already invested in its ecosystem (e.g., Gmail, Docs).
Dropbox – Best for Ease of Use and Compatibility
Why choose Dropbox?
- You value reliability and simplicity.
- You’re used to Dropbox and already use it for other projects.
- You want easy file access across platforms and devices.
When to use it?
- You need a quick setup with minimal configuration.
- You’re working solo or in a small group.
- You prefer Dropbox’s user interface or already use it for sharing documents or media.
Summary: Which Cloud Should You Choose?
| Feature/Need | NextCloud | Google Drive | Dropbox |
|---|---|---|---|
| Privacy & Data Control | ⭐⭐⭐⭐⭐ | ⭐⭐ | ⭐⭐ |
| Ease of Setup | ⭐⭐ | ⭐⭐⭐⭐ | ⭐⭐⭐⭐ |
| Collaboration with Bands | ⭐⭐⭐⭐⭐ | ⭐⭐⭐ | ⭐⭐⭐ |
| Integration with Google Services | ⭐ | ⭐⭐⭐⭐⭐ | ⭐ |
| File Syncing Reliability | ⭐⭐⭐⭐ | ⭐⭐⭐⭐ | ⭐⭐⭐⭐ |
| Access Speed | ⭐⭐⭐ | ⭐⭐⭐⭐⭐ | ⭐⭐⭐ |
| Self-hosting Option | ⭐⭐⭐⭐⭐ | ❌ | ❌ |
Cloud access
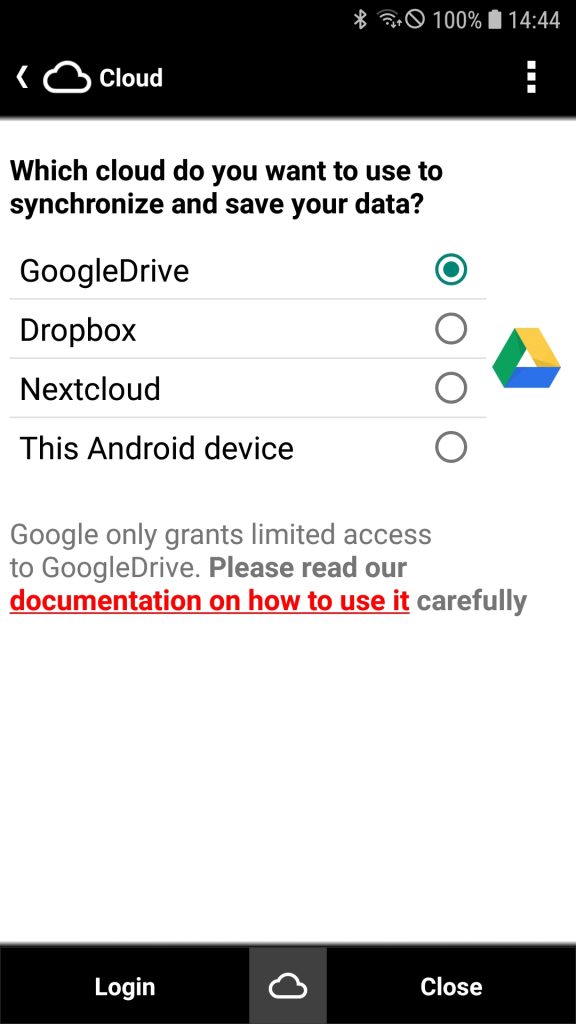
1. Select cloud and log in
The first time you use a tool that requires cloud access, the cloud tool will open automatically. Here you can choose between GoogleDrive, Dropbox and NextCloud.
After selecting, you must log in to the selected cloud using the Login button. Depending on the provider, you will either be asked for your username and password or asked to log in using an existing account.
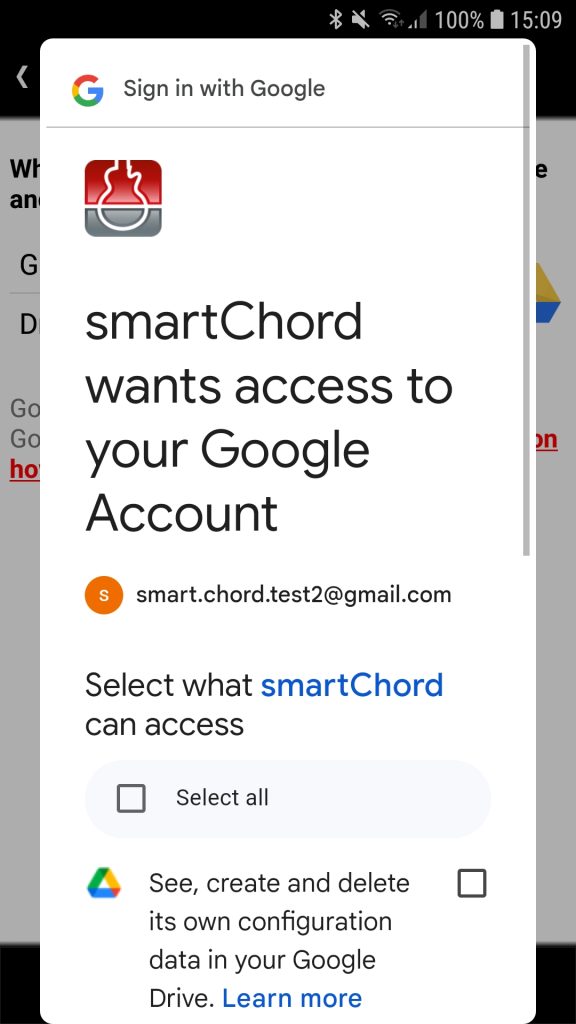
When you log in for the first time, you will be asked for permission for smartChord to access your data. Only with your consent can smartChord access the cloud and use it for file sharing.
After successful login, the Login button changes to a Logout button. You can use this to revoke smartChord’s access to your cloud at any time.


2. Prepare the cloud for use
To use your cloud with smartChord, some preparation steps are required. GoogleDrive and Dropbox have different policies regarding third-party access, so preparation varies depending on the cloud provider.
2.1 Dropbox
In order for smartChord to access Dropbox files and save new files, a directory must be specified. Since Dropbox allows apps to read existing directories as well as create new ones, you don’t need to set anything up. However, we recommend creating a directory called ‘smartChord’. To make organization easier, we recommend the following subdirectories:
- ‘backup’: for backing up your smartChord data
- ‘setlists’: for sharing set lists
- ‘songs’: for sharing songs
- ‘sync’: for synchronizing the contents of your devices
You can create these directories either via the Dropbox web interface or directly with the smartChord File Explorer. You can access the File Explorer in the cloud tool via the Cloud button.
2.2 GoogleDrive (for new users)
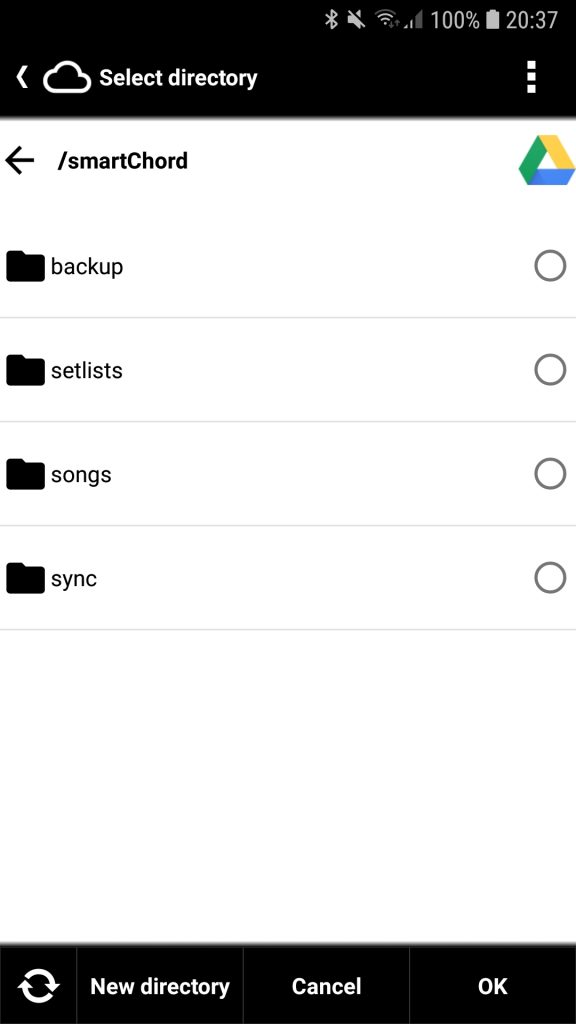
In order for smartChord to access files in GoogleDrive and save new files, a special directory must be specified. Since GoogleDrive only grants apps access to directories they have created in the app itself, you must create the directory using the smartChord File Explorer. You can access the File Explorer via the Cloud button in the cloud tool. However, we recommend creating a directory called ‘smartChord’. To make organization easier, we recommend the following subdirectories:
- ‘backup’: for backing up your smartChord data
- ‘setlists’: for sharing set lists
- ‘songs’: for sharing songs
- ‘sync’: for synchronizing the contents of your devices
2.3 GoogleDrive (for existing users)
Google has strengthened its data protection measures and significantly restricted third-party access to Google Drive. Some smartChord users are already affected and have been blocked. As a result, we had to re-implement the way smartChord accesses Google Drive. The old access method will no longer work in the future, so all users must switch to the new method.
To continue using Google Drive, you’ll need to activate the new access method and prepare your Google Drive accordingly. While this requires some effort, it is unavoidable. The good news is that the new method is significantly faster, requires no special permissions, offers improved data protection, and no longer requires logging in via a browser.
PLEASE NOTE that the new GoogleDrive interface has restricted access to your cloud. It can only see folders that are created using smartChord. This means it is not possible to use the folders you previously used with smartChord. We recommend the following procedure:
- Log in to the GoogleDrive web interface here and rename your old ‘smartChord’ folder to ‘smartChordOld’
- Go to the smartChord home screen
- Open the settings and navigate to General Settings -> Cloud and click on it
- The Cloud tool will appear. Activate the option New Google Drive Access
- Press the Login button to sign in to GoogleDrive using the new method as described in Select cloud and log in
- Create the new folders in GoogleDrive using smartChord, as outlined in GoogleDrive (for new users).
Please note that:- you CANNOT copy the old folders into the new ones, as the app does NOT have access to pre-existing folders!
- it is important to create the new folders using smartChord. Just then smartChord is allowed to see and access the folder!
- Use the GoogleDrive web interface to move your existing files from the old folders to the newly created folders. Unlike folders, the app can access existing files


Troubleshooting
If you are unable to access your Google Drive as you have trouble to login to your account. This usually happens because of a temporary glitch in the connection or because the app’s permissions need to be refreshed. Here are a few things you can try to fix this. After each step, try to login again.
- Try Again Later: Sometimes, temporary issues can cause this problem. Please try again in a few minutes
- Check your internet connection: Make sure, that your Internet is working correctly
- Restart the App: Close the app completely and then open it again. This can sometimes clear out any temporary issues
- Restart your phone. This can also clear out any temporary issues
- Check with the Google Drive app if you can access your Google Drive to see if there is a valid account on your device
- Check with another app which has access to your Google Drive to see if there is a valid account on your device
- Revoke permissions for smartChord in Google Drive
How to revoke permissions for smartChord in Google Drive:
- Go to Google Account Security Settings:
- Visit myaccount.google.com and log in if you aren’t already.
- Navigate to Security Settings:
- In the left sidebar, click Security.
- Manage Third-Party Access:
- Scroll down to the Third-party apps with account access section.
- Click Manage third-party access to view a list of all the apps and services that have access to your Google account.
- Find the App and Remove Access:
- Locate the app you want to remove in the list.
- Click on the app’s name, then select Remove Access to revoke permissions.
- Confirm Removal:
- Confirm that you want to remove the app’s access when prompted.
This will disconnect smartChord from your Google account and revokes any permissions it previously had. After that, please login again.
Change the cloud or account
You can use multiple clouds and accounts to save, share, and sync your data. Once you’re logged in, the last used cloud and account will be automatically selected for authentication and authorization. To switch clouds, simply click the Cloud icon to open the Cloud screen, where you can choose a different cloud. To switch accounts, click the Logout button. After logging out, use the Login button to sign in again and select your desired account. Once logged in, the Cloud screen will close automatically, and the share or sync tool will resume.


File Explorer
The File Explorer is used from different tools for different tasks. It has three different modes:
- Explore the folders and files in your cloud storage
- Select a folder in your cloud storage
- Select a file in your cloud storage
The appearance and available actions will change slightly depending on the mode.
Use the File Explorer as follows:
- Click on a folder to open it.
- Click the radio button to the right of a folder to select it.
- Click on a file to select it.
- Tap the arrow to the left of the main folder name to navigate to the parent directory.
- Click the “New” button to create new folders.
- Click the “Refresh” button in the lower left corner to update the file and folder list if you’ve made changes using another tool.
- Click the “OK” button to confirm your selection of a file or folder.
- Click the cloud icon to open the Cloud tool, switch the cloud service, or log out.
Shared folders
Dropbox
How to share a Dropbox file or folder.
Share folders in Google Drive BUT NOTE: Sharing folders was possible in the past, but Google changed the behavior of shared folders. Please see: https://www.androidpolice.com/2020/04/10/google-completely-ruined-shared-folders-in-drive/
As an alternative, you could …
- Create a new Google account just for sharing. You and your bandmates …
- use this account to sync your songs and set lists
- know the mail address and the password for this account
- log in to GoogleDrive with this account when you synchronize your songs and set lists in smartChord. Please note: Do not change the account in the Google Play Store. This is important because your purchases and therefore your licenses in the Google Play Store are linked to this account.
- Use Google Workspace. It allows shared drives and shared folders as they worked in the past.
- Use Dropbox.
Troubleshooting
Login
Endless loop when logging in
It is strongly recommended to use Chrome for the login. Other browsers may fail. Please use Chrome and check if it is an browser issue. If you have been logged in in the past, please try to logout and retry login.
Logging fails on Chromebook
For us it seems that a Chromebook is still not ready for all Android apps. They are still working on it. Please check if you have the latest version installed: https://support.google.com/chromebook/answer/177889
If it does not work, Use this workaround. Please install “Chrome for Android (BETA)” from the Play Store and use this for login.
Synchronizing without a cloud
Step-by-Step Guide: Sync a Protected Android Folder with Your PC (No Cloud)
This guide will show you how to automatically synchronize a specific folder from the “smartChord” app on your Android phone with a folder on your Windows PC. The configuration is complex and the guide quickly becomes outdated. Therefore only recommended for technically experienced users.
This method does not use the cloud (like Google Drive or Dropbox). Instead, it works directly over your home Wi-Fi network. Your data stays private and is only transferred between your two devices.
Of course. Here is a step-by-step guide for users who are not so tech-savvy to synchronize the /storage/emulated/0/Android/data/de.smartchord.droid/files/localCloud folder on their Android device with a folder on their PC using Syncthing, without using a cloud service.
Syncing Your smartChord Data Between Android and PC with Syncthing (No Cloud Needed)
This guide will walk you through setting up Syncthing to automatically synchronize the data from the smartChord app on your Android device to a folder on your computer. This happens directly between your devices over your local Wi-Fi network, so no cloud storage is involved.
What you’ll need:
- Your Android device.
- Your PC (Windows, macOS, or Linux).
- Both devices connected to the same Wi-Fi network.
Part 1: Setting up Syncthing on Your PC
- Download and Install Syncthing:
- On your PC, open a web browser and go to the official Syncthing website: https://syncthing.net/downloads/
- Download the correct version for your operating system (e.g., Windows, macOS).
- For Windows, you can download “Syncthing for Windows”. Unzip the downloaded file. Inside, you’ll find
syncthing.exe. Double-click it to start. A black command window will appear, and then the Syncthing user interface will open in your web browser.
- The Syncthing Interface on Your PC:
- When Syncthing opens in your browser, it will look something like a dashboard. This is where you’ll control everything.
- You will see a “Default Folder” already set up. You can ignore this for now.
- At the top right, under “This Device”, you’ll see the name of your PC.
Part 2: Setting up Syncthing on Your Android Device
On recent Android versions, the /Android/data/ folder is protected. To allow Syncthing to access it, you first need to grant permission using a specific type of file manager app.
- Install a File Manager That Can Grant Access:
- On your Android device, go to the Google Play Store.
- Search for and install a file manager app like “Material Files” or a similar one that is known to be able to request access to this restricted folder.
- Grant Access to the ‘Android/data’ Folder:
- Open the file manager app you just installed.
- Navigate to the
/storage/emulated/0/Android/data/folder (it might just be labeled asAndroid/datain the app’s main storage view). - When you try to open this folder, Android will likely show a pop-up message asking you to grant access. Follow the on-screen instructions to allow it. This is a crucial step.
- Install Syncthing on Your Android Device:
- Go back to the Google Play Store.
- Search for and install the “Syncthing” app.
- Initial Setup of Syncthing on Android:
- Open the Syncthing app on your Android device.
- You will be guided through a quick setup. Grant any permissions the app asks for, such as for storage access.
Part 3: Connecting Your PC and Android Device
Now, you’ll make your two devices aware of each other.
- Get Your PC’s Device ID:
- On your PC, in the Syncthing web interface, click on “Actions” in the top right and then “Show ID”.
- A QR code and a long string of letters and numbers (the Device ID) will appear.
- Add Your PC to Your Android Device:
- On your Android device, in the Syncthing app, tap the “Devices” tab at the bottom.
- Tap the
+icon in the top right. - Tap the QR code icon next to “Device ID”.
- Point your phone’s camera at the QR code displayed on your PC’s screen. This will automatically fill in your PC’s Device ID.
- Give your PC a recognizable name (e.g., “My Laptop”).
- Tap the checkmark in the top right to save.
- Confirm the Connection on Your PC:
- Back on your PC’s Syncthing interface, a message will pop up at the top asking if you want to connect to your Android device. Click “Add Device”.
- You can change the name of your Android device if you wish. Click “Save”.
Your devices are now connected!
Part 4: Setting up the Folder to Synchronize
This is the final and most important part: telling Syncthing which folder to sync.
- Add the smartChord Folder on Your Android Device:
- On your Android device, in the Syncthing app, go to the “Folders” tab at the bottom.
- Tap the
+icon in the top right. - Folder Label: Give it a name you’ll remember, like “smartChord Sync”.
- Folder Path: This is the most critical step. Tap on “Directory” and navigate to the following folder:
/storage/emulated/0/Android/data/de.smartchord.droid/files/localCloud- (Because you granted access earlier with the file manager, Syncthing should now be able to see and select this folder).
- Sharing: Under “Share With”, check the box next to the name of your PC.
- Tap the checkmark in the top right to save.
- Accept the New Folder on Your PC:
- On your PC’s Syncthing interface, a new message will pop up at the top, telling you that your Android device wants to share a folder named “smartChord Sync”. Click “Add”.
- A new window will appear.
- Folder Label: Keep it as “smartChord Sync”.
- Folder Path: This is where you choose a folder on your PC to store the synchronized files. For example, you could create a new folder in your “Documents” called “smartChord” and select that path.
- Click “Save”.
Done!
That’s it! Syncthing will now start synchronizing the contents of the .../files/localCloud folder from your smartChord app on your Android device to the folder you selected on your PC.
You can check the status in the Syncthing interfaces on both your PC and Android. It will show you the sync progress and when the folders are “Up to Date”. Any changes you make in one location will be automatically sent to the other as long as both devices are on and connected to the same Wi-Fi network.