Save and organize
Menus
Many features allow you to save your content like songs, exercises, chord progressions, drum patterns or fretboard quizzes. All of these features do have the same menus.

- The Folder menu is the menu to organize your items. It allows you to create something new, such as a song or exercise, save it, reopen your saved items or Open At Random. It hosts also functionality to share the item or to add notes
- History provides quick access to your most recently saved items. Items are sorted by their last use, with the most recent ones at the top of the list. You can also search the list to quickly find any item.
- The Navigation menu in the upper left corner to move between screens/features
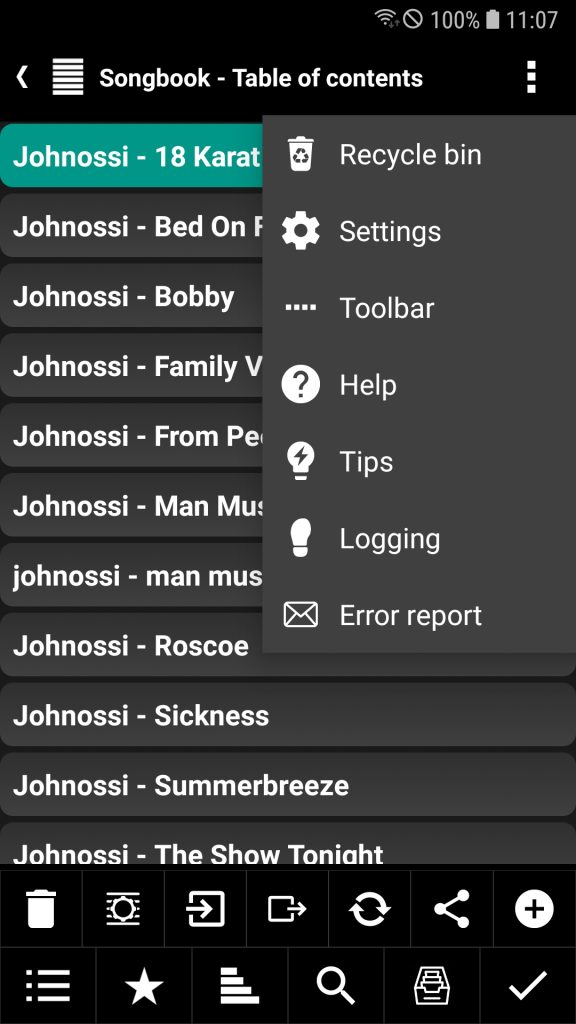
- Moreover (⋮) menu upper right corner for on-screen actions, settings and help
- Click on the item name to go directly to the table of contents
- The toolbar at the bottom of each screen contains the most commonly used functions
- There is an option for a personalized toolbar at the top for quick access to your favorite functions


Table of contents

Once you’ve created and saved a song, quiz, exercise, or similar, this item will be listed in the table of contents. It is also the place where the content is organized. To keep an overview, you can sort, search and favor your content.
Depending on the respective feature, you will also find additional functions such as import, export, synchronization and sharing.
It also offers a context-sensitive menu and supports double-clicking for easy selection.
The table of contents can always be opened via the ‘Folder’ menu or a click on the item’s name on the feature screen.
Note: It is always worth taking a look at the settings. There are true treasures slumbering. For example:
Table of Contents mode
There are two different ways in which the table of contents is integrated into the respective tool. You can choose one or the other way using the Table of Contents mode in its settings.
If the Table of Contents mode is active, the screen ‘Table of Contents’ is opened before the feature itself. There you can select one of the stored items to open the item with the feature. If we take the songbook as an example. With the ‘Table of contents’ mode activated, the ‘Table of Contents’ of the songbook is shown if you start the songbook. There you can select a song and the Songbook is started to show the song. If you go ‘Back’ from the songbook, the ‘Table of Contents’ is shown again. With the ‘Table of Contents’ mode deactivated, the songbook is started immediately with the last song. To open the ‘Table of Contents’, you have to use the ‘Folder’ menu.
Multi-functional
The Table of contents is a true multi-talent and works for all items which allows to create items like songs or drum patterns. It provides a consistent interface, but not every function is available for each feature.
- Categorize your item(s), to supplement them with helpful information and find them more quickly
- Create a new item and start the feature screen
- Edit multiple items at one with the data maintenance
- Delete selected item(s)
- Download shared items for import e.g. Drum Patterns
- Export the selected item(s) to files
- Favor your item(s) to find them more quickly (see settings)
- Import new items. Normally from files.
- Open the selected item in the feature screen (use a double click as a shortcut)
- Preview: some features provide a functional preview like the Drum Machine
- Share the selected item(s) with your friends, musicians or students
- Synchronize your between devices or with the cloud
- Rename the selected item (long click)
- Toggle between single and multi-selection
- Search in the list of your items
Search
Use the Search button to look for special items. The search does support two search modes.
The name search allows you to search by the name of an entry.
The full-text search allows you to search not only by the name of an entry but also by its content.
- It can be used to search for chords, song text or arbitrary song information
- The search also supports the wildcards ‘?’ for any character and ‘*’ for 0 or more characters
- Complex search terms can be logically linked with ‘AND’, ‘OR’, ‘(‘ and ‘)’
- Option for case-sensitive search
Tip: To find your songs quickly, you can use the fast scrolling by dragging the scrollbar at the right side.


Sorting
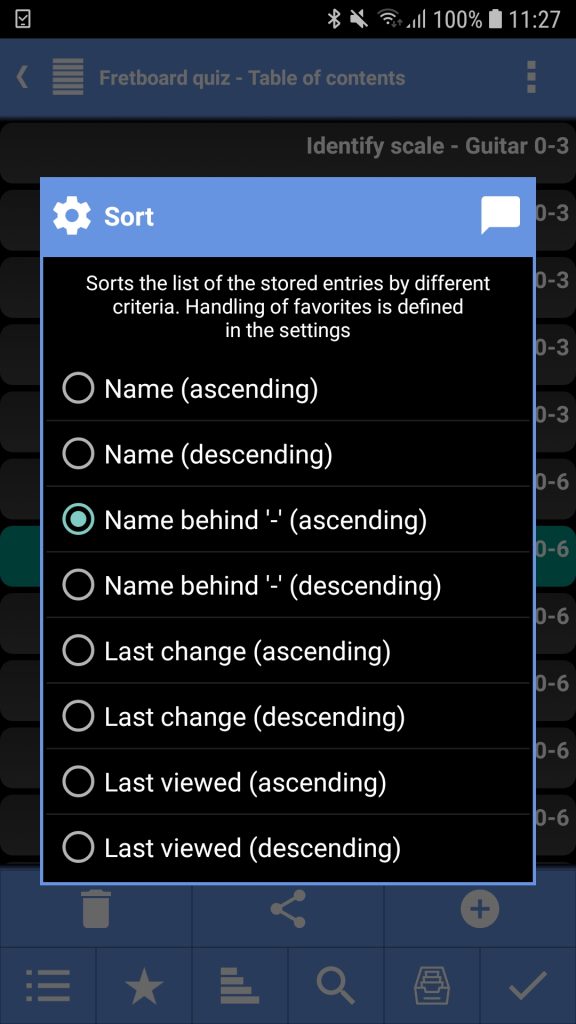

Sorting the table of contents in smartChord allows for quick and efficient retrieval of entries by providing an organized structure. Additionally, smartChord automatically saves the creation and access times of each entry, enabling the use of these timestamps for sorting the table of contents beyond just names and dates.
In the settings, you have the flexibility to define how favorites are handled. By choosing to prioritize favorites, they will be sorted and listed ahead of other entries, ensuring quick access and visibility.
In general, there is no need to follow a naming convention in smartChord. But whenever possible, smartChord applies a naming convention. For songs it is ‘artist name – song name’. If you want to sort by artist, you can use the option “Name behind ‘-‘”.
Organize items in categories
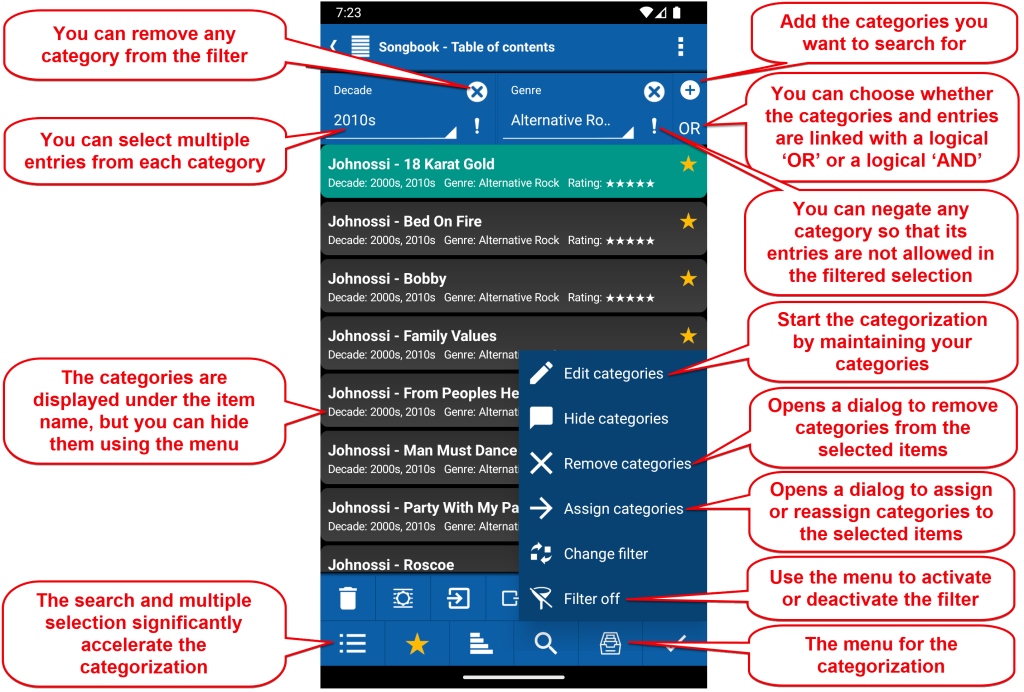
Stored items — songs, exercises, setlists, drum patterns, custom chords and more — can be tagged with categories and then filtered, sorted and searched by those tags. smartChord ships with a useful default set (Decade, Genre, Mood, Occasion, Popularity, Rating), and you are free to rename, delete or add categories and entries so they match the way you think about your music.
The workflow is the same everywhere items are stored:
- Create and edit categories. Open Edit categories to manage the category types on top and their entries below, and confirm with the checkmark.
- Assign categories. Select one or many items, pick Assign categories and tag them all in a single step — multi-value entries and multi-item selection are supported, existing tags are preserved.
- Filter, combine and negate. Turn on the filter, add the categories you are looking for, and combine them with AND or OR. Any criterion can be negated to exclude a value; Filter off disables the filter without losing its configuration.
- Show, hide or remove tags. Hide the category line beneath item titles for a compact overview, or drop selected category values with Remove categories without touching the items themselves.
For the full step-by-step walkthrough — with screenshots, the predefined category set, bulk tagging workflows, filter logic, and the companion tools (sort, search, favorites, recycle bin) — see the dedicated How-to article: How to organize items in categories.
Export
Certain types of items, such as songs, can be exported. If exporting is available for a single or multiple items, an Export button will appear. By default, the exported items are saved in a subfolder under:
/storage/emulated/0/Android/data/de.smartchord.droid/files/
(Note: The 0 may vary depending on your device.)
This folder is exclusively allocated to the app, allowing smartChord full access without requiring additional permissions. It is secure, meaning no other apps can access it without special permissions.
To make the process even easier, we’ve integrated a built-in file explorer. After exporting, you can open this file explorer to view the folder’s contents, copy the directory path, or transfer the exported files to another location.
If you prefer, you can customize the export folder in the General Settings. When a custom folder is defined, exported files will be saved there, making them more accessible using your preferred method.

Recycle Bin
The Recycle Bin acts as a safety net for your data. It prevents the accidental loss of songs, setlists, exercise plans, or custom instruments by temporarily storing deleted items instead of removing them instantly and permanently. You can find the Recycle Bin in the table of contents ‘⁝‘ menu.
The Recycle Bin protects your data from accidental loss by storing deleted items before they are permanently erased.
- Search & Select: Use the search field to filter items by name. You can select multiple items to restore or delete them in bulk.
- How to Restore: Select the desired items and tap Restore. They will return to their original position in the Table of Contents.
- Permanent Deletion: To permanently erase data, select the items and tap Delete. You will be asked to confirm this action, as it cannot be undone.
- Safety First: Items stay in the database after deletion until you manually empty the Bin, providing a flexible safety net for your workspace.